
Guitar Chords for Beginners: The First Chords That Unlock Real Songs
Learn the 8 essential beginner guitar chords with diagrams, fingerings, smooth change drills, strumming basics and a 4-week practice plan.
The eight chords every beginner should learn first are Em, Am, C, G, D, A, E and Dm. Played as open shapes in standard tuning (EADGBE), they represent the essential basic guitar chords for beginners and cover the keys of G, C, D, A and E minor — enough to strum along with thousands of songs once you can change between them without stopping. Rather than attempting to tackle all guitar chords for beginners on day one, mastering just this handful provides the fastest path to playing real music.
This guide gives you each chord as a diagram with finger numbers, the mistake that ruins it, and a practice plan for smooth changes. If you are new to chord boxes, our guide on how to read guitar chord charts explains strings, frets, O/X symbols, and finger numbers in detail. Try every shape in the Virtual Guitar Lab as you read: hear the chord and compare it with your own guitar.
Em — E minor
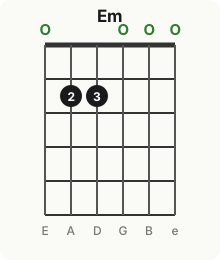
| String | 6 | 5 | 4 | 3 | 2 | 1 |
|---|---|---|---|---|---|---|
| Fret | 0 | 2 | 2 | 0 | 0 | 0 |
| Finger | — | 2 | 3 | — | — | — |
Em is the easiest full chord on the guitar: only two fingers, and every string rings. Place your middle finger on the 5th string, 2nd fret, and your ring finger directly below it on the 4th string, 2nd fret. Strum all six strings.
Common mistake: letting a finger lean against a neighbouring open string. Curl your knuckles so your fingertips come down vertically, and check each string one at a time for buzzes.
Am — A minor
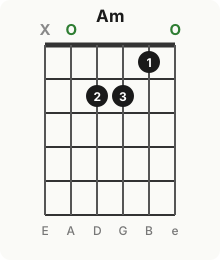
| String | 6 | 5 | 4 | 3 | 2 | 1 |
|---|---|---|---|---|---|---|
| Fret | X | 0 | 2 | 2 | 1 | 0 |
| Finger | — | — | 2 | 3 | 1 | — |
Am stacks three fingers across three neighbouring strings: index on the 2nd string 1st fret, middle on the 4th string 2nd fret, ring on the 3rd string 2nd fret. Skip the 6th string entirely — start your strum from the 5th string down.
Common mistake: strumming all six strings so the low E drones against the chord. The X means “don’t play this string” — rest your pick tip on the 5th string before each strum until starting there is automatic.
C — C major
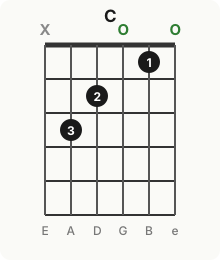
| String | 6 | 5 | 4 | 3 | 2 | 1 |
|---|---|---|---|---|---|---|
| Fret | X | 3 | 2 | 0 | 1 | 0 |
| Finger | — | 3 | 2 | — | 1 | — |
C major stretches your hand: ring finger on the 5th string 3rd fret, middle on the 4th string 2nd fret, index on the 2nd string 1st fret. Like Am, skip the 6th string.
Common mistake: muting the open 3rd string (G) with the ring finger reaching to the 5th string. Arch that finger high and keep your thumb behind the neck so your fingers approach at a steep angle.
G — G major
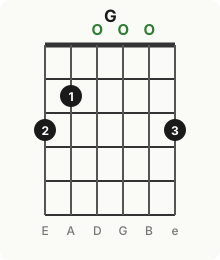
| String | 6 | 5 | 4 | 3 | 2 | 1 |
|---|---|---|---|---|---|---|
| Fret | 3 | 2 | 0 | 0 | 0 | 3 |
| Finger | 2 | 1 | — | — | — | 3 |
G is the only first chord that uses all six strings. Middle finger on the 6th string 3rd fret, index on the 5th string 2nd fret, ring (or little) finger on the 1st string 3rd fret.
Common mistake: a dead high E string because the ring finger flops flat instead of pressing with its tip. Push it right up behind the 3rd fret wire and check the 1st string alone every time.
D — D major
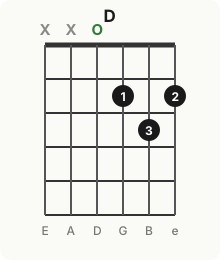
| String | 6 | 5 | 4 | 3 | 2 | 1 |
|---|---|---|---|---|---|---|
| Fret | X | X | 0 | 2 | 3 | 2 |
| Finger | — | — | — | 1 | 3 | 2 |
D lives on the top four strings only: index on the 3rd string 2nd fret, ring on the 2nd string 3rd fret, middle on the 1st string 2nd fret. Your three fingers form a tight triangle. Strum from the 4th string down and leave strings 5 and 6 silent.
Common mistake: cramming all three fingers together so the 1st string chokes. Keep each finger on its fingertip with the thumb low on the back of the neck.
A — A major
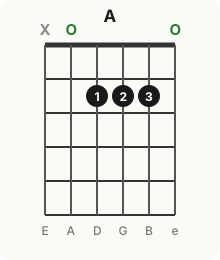
| String | 6 | 5 | 4 | 3 | 2 | 1 |
|---|---|---|---|---|---|---|
| Fret | X | 0 | 2 | 2 | 2 | 0 |
| Finger | — | — | 1 | 2 | 3 | — |
Three fingers crowd into the 2nd fret across strings 4, 3 and 2. The classic fingering is index-middle-ring in a row; some players stack the index across all three and squeeze the others in. Either works — choose the one where all three strings ring.
Common mistake: the open high E going dead because the ring finger leans on it. Angle your fingers slightly toward the headstock so their tips clear the open string below.
E — E major
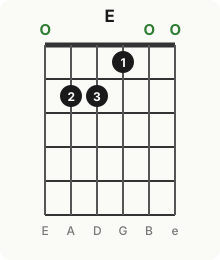
| String | 6 | 5 | 4 | 3 | 2 | 1 |
|---|---|---|---|---|---|---|
| Fret | 0 | 2 | 2 | 1 | 0 | 0 |
| Finger | — | 2 | 3 | 1 | — | — |
E major is Em with one finger added: the index presses the 3rd string, 1st fret, turning the open G into G♯. All six strings ring. Keep the index curled tight so it does not touch the open strings on either side.
Common mistake: pressing with the flat of the index and killing the open B and high E beside it. Practise switching between Em and E slowly: only the index moves, and hearing that single-semitone difference trains your ear for major versus minor.
Dm — D minor
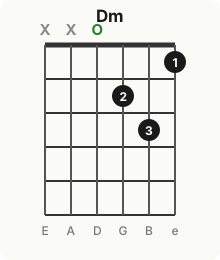
| String | 6 | 5 | 4 | 3 | 2 | 1 |
|---|---|---|---|---|---|---|
| Fret | X | X | 0 | 2 | 3 | 1 |
| Finger | — | — | — | 2 | 3 | 1 |
Dm mirrors D but the shape flips: middle on the 3rd string 2nd fret, ring on the 2nd string 3rd fret, index on the 1st string 1st fret. Strum the top four strings only.
Common mistake: pressing the 1st string with the pad of the index so the fingertip dulls the 2nd string. Bring your wrist slightly forward so the index stands upright, close to the fret wire where less pressure is needed.
How to change chords smoothly
Knowing eight shapes means nothing with a two-second silence between them. Smooth changes come from three techniques, not finger speed.
Anchor fingers. When two chords share a fretted note, keep that finger down. Em to E keeps fingers 2 and 3 glued in place; C to Am keeps the middle and ring roughly where they are; G to D keeps the ring finger near the 2nd string. Plan each change around what stays, not what moves.
Air changes. Beginners place one finger, then the next, then the next. Instead, release the old chord, hover the new shape a centimetre above the strings, then drop all fingers together.
One-minute changes. Pick two chords, set a timer for 60 seconds, and count clean switches, strumming once per change. Log the score. The table below gives realistic targets — when you beat a target three days running, pick a new pair.
| Chord pair | Week 1 target | Week 3 target | Why this pair |
|---|---|---|---|
| Em ↔ Am | 30 changes | 60 changes | Same end of the neck, one-finger logic |
| G ↔ C | 20 changes | 50 changes | Big jump; trains the ring-finger anchor |
| D ↔ A | 25 changes | 55 changes | Triangle shapes; trains fingertip accuracy |
| E ↔ Am | 25 changes | 55 changes | Common song movement in E and A |
Practise changes with a Metronome at 50–60 bpm, one strum per click. If a change always fails, isolate it: loop just those two chords for the whole session.
Strumming basics
A chord is half the sound; the right hand is the other half. Hold the pick between thumb and the side of the index finger with only the tip showing, and strum from the wrist — not the elbow.
Start with three patterns, looped on a single chord before combining with changes:
- Four down-strums: 1 – 2 – 3 – 4. Every beat gets a downstroke. This is your default while learning shapes.
- Down, down-up, down-up: the first “eight-note” pattern most beginners learn. Count “1, 2-and, 3-and, 4”.
- The slow ballad: down on 1, down-up on 2, up on the “and” of 3, down on 4 — deliberately missing beat 3 to feel the gap.
Two rules prevent most bad habits: keep the strumming hand moving like a pendulum even on beats you intentionally miss, and strum quietly enough to hear every string. Soft strumming exposes muted strings, which is exactly what you want while practising. The Virtual Guitar Lab includes strum patterns you can preview and copy.
Electric vs acoustic: same chords, different feel
The fingerings in this guide are identical on both instruments — a C major is a C major everywhere. What differs is how the guitar responds to a beginner’s hands.
An acoustic’s heavier strings need more finger pressure, and its higher action punishes weak fingertips faster. That resistance builds hand strength quickly, but sore fingers end sessions early in the first fortnight — light strings (11-gauge or silk-and-steel) meaningfully reduce the pain without changing anything you learn here.
An electric’s lighter strings and lower action fret with far less force, so chords ring cleanly sooner — but amplifier gain amplifies sloppy mutes and stray ringing. If you practise on electric, spend half your time on a clean channel so mistakes stay audible instead of hiding under distortion.
Whichever you own, learn on it. Switching later takes days, not months: the shapes transfer, only the touch changes. For string names and tuning before each session, see How to Tune a Guitar and the Guitar Tuning Chart.
Your first songs (public-domain melodies)
When looking for effective guitar chords for beginners songs to build confidence, you do not need copyrighted repertoire to make music. The public-domain melodies below each use a tiny chord vocabulary — the chord change, not the melody, is the skill being trained.
- “Twinkle, Twinkle, Little Star” — works over just C and G (add F later). Its slow tempo and single change per bar give you a full bar to prepare each shape.
- “Oh! Susanna” — a two-to-three-chord song (C, G, and later D7) with a steady strumming pulse that suits the four-down-strums pattern.
- “Amazing Grace” — three chords (G, C, D) at a hymn tempo where nobody minds a slow change; ideal for practising the G-to-C jump under zero pressure.
- “Down by the Riverside” — a simple repeating progression that rewards the E-to-A and G-to-C pairs from the one-minute-changes table.
Play each melody’s chord loop with pattern 1 above, humming the tune over the top. When all four loops run without a pause, you have genuinely finished the beginner-chord stage. (Song titles are referenced here as practice examples only; no chord sheets or lyrics are included.)
Your 4-week practice plan
Twenty focused minutes a day beats a weekend binge: 5 minutes of one-minute changes, 10 minutes on the week’s chords and pattern, 5 minutes playing a song loop.
| Week | New chords | Strumming | Goal by Sunday |
|---|---|---|---|
| 1 | Em, Am, E | Four down-strums | Em ↔ Am at 30 changes/min, each string ringing |
| 2 | C, G | Down, down-up pattern | G ↔ C at 20 changes/min; “Twinkle” loop without stopping |
| 3 | D, A, Dm | Ballad pattern | D ↔ A at 25 changes/min; two song loops from memory |
| 4 | All eight + E7/A7 | Any pattern at 70 bpm | Any pair at 50+/min; one full song loop performed for someone |
Rules for all four weeks: tune first with the Guitar Tuner, practise changes before songs, and stop finger drills the moment your fingertips go numb. If a week’s goal slips, repeat the week rather than advancing on shaky foundations.
Printable chart and next steps
Pin the shapes on your wall: Download the printable PDF for a handy guitar chords for beginners pdf reference sheet with the essential open chords as fingered grids. The full reference — sevenths, movable barre shapes and a guide to reading diagrams — lives in our companion page, the Guitar Chord Chart.
When the eight chords feel comfortable, the logical next steps are learning where every note lives in Guitar Fretboard Notes, connecting the shapes with the CAGED System, and turning chords into solos via the Pentatonic Scale.
Related tools
- Virtual Guitar Lab — hear every chord in this guide, preview strum patterns, and test changes against in-tune reference pitches.
- Guitar Chord Chart — the printable companion reference to this guide.
- How to Read Guitar Chord Charts — symbols, numbers, barre notation, and chord symbols decoded.
- Guitar Tuner — tune to standard EADGBE before every practice session.
- Metronome — time your one-minute changes and strumming patterns.
- Circle of Fifths — see which of these chords belong to the same key.